Event-Handling & Responder Chain
We know that when we add a button to a view controller’s view or some view and wire up a target-action, our action method ends up getting called when the user taps on the button.
We’re going into detail about how all of this happens.
Event Generation & Delivery
When a user taps on the phone’s screen, a sequence of activities happen in the following order:
-
The finger creates a change in the electrostatic field at the location where the screen is touched, delivering an electric signal to the processor.
-
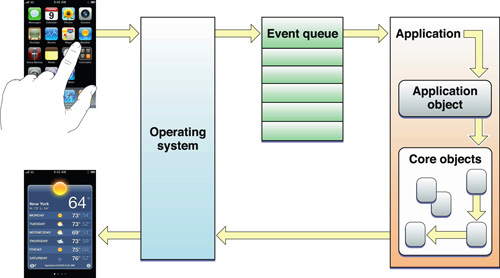
The operating system relays the event to the application’s main event queue.
-
The event gets pulled off the event queue by the application’s main run loop at some point, and is converted into an UITouch object wrapped in an UIEvent object for dispatch.</br></br>

Image from Apple</br></br>
- This event object travels down the dispatch hierarchy following path:
Application —sendEvent(_:)—> Key Window —sendEvent(_:)—> View —hitTest(_:with:)—> Subviews</br></br>

Image from Apple
Finding the Event’s Intended Recipient
The purpose of event delivery is to forward the event to the view that is under the touch. To do that, the application hit-tests subviews under the view controller’s view and their subviews until it finds the intended recipient.
class UIView : UIResponder {
    .
    .

    func hitTest(_ point: CGPoint, with event: UIEvent?) -> UIView? {

        // If any of the following conditions are true,
        // then myself, my subviews and their subviews cannot be the intended recipient of the touch event:
        // * I'm not user interactive, or
        // * I'm hidden, or
        // * I'm transparent, or
        // * My rect doesn't contain the touch point
        guard isUserInteractionEnabled && !isHidden && alpha > 0.01 && self.point(inside: point, with: event) else {
            return nil
        }

        // Otherwise, recursively call hitTest on my subviews & their subviews to find the recipient of the touch event
        for subview in subviews {
            if let view = subview.hitTest(convert(point, to: subview), with: event) {
                return view
            }
        }

        // If none of my subviews meet the conditions to be the recipient of the touch event,
        // then I must be the most appropriate recipient of the event
        return self
    }
}
In our case, the intended event recipient is the button we’ve added to our view controller’s view.
Handling the Event
The event recipient can either choose to handle the event or to not handle the event. In the case where the recipient wishes to handle the event, it does so by implementing any one of the following UIResponder methods (for practical reasons, however, it probably implements most of them):
func touchesBegan(_ touches: Set<UITouch>, with event: UIEvent?)func touchesMoved(_ touches: Set<UITouch>, with event: UIEvent?)func touchesEnded(_ touches: Set<UITouch>, with event: UIEvent?)func touchesCancelled(_ touches: Set<UITouch>, with event: UIEvent?)
Our button implements all of them, and our action method will be invoked depending on the control event(s) we’ve wired our target-action for, that is, when the button calls UIControl’s sendAction(_:to:for:) method on its registered targets and action methods.
class UIButton : UIControl {

    .
    .
    // A simplified touchesBegan implementation for UIButton to trigger target-action
    override open func touchesBegan(_ touches: Set<UITouch>, with event: UIEvent?) {

        // Do a bunch of other stuff here
        .
        .
        // Trigger target-action
        sendActions(for: .touchDown)
    }

    // A simplified touchesEnded implementation for UIButton to trigger target-action
    override open func touchesEnded(_ touches: Set<UITouch>, with event: UIEvent?) {

        // Do a bunch of other stuff here
        .
        .
        // Trigger target-action
        switch touches.first?.location(in: self) {
        case let .some(touchPoint) where hitTest(touchPoint, with: event) != nil:
            sendActions(for: .touchUpInside)
        case let .some(touchPoint) where hitTest(touchPoint, with: event) == nil:
            sendActions(for: .touchUpOutside)
        // Handle some other cases here
        .
        .
        default:
            break
        }
    }
}
Not Handling the Event
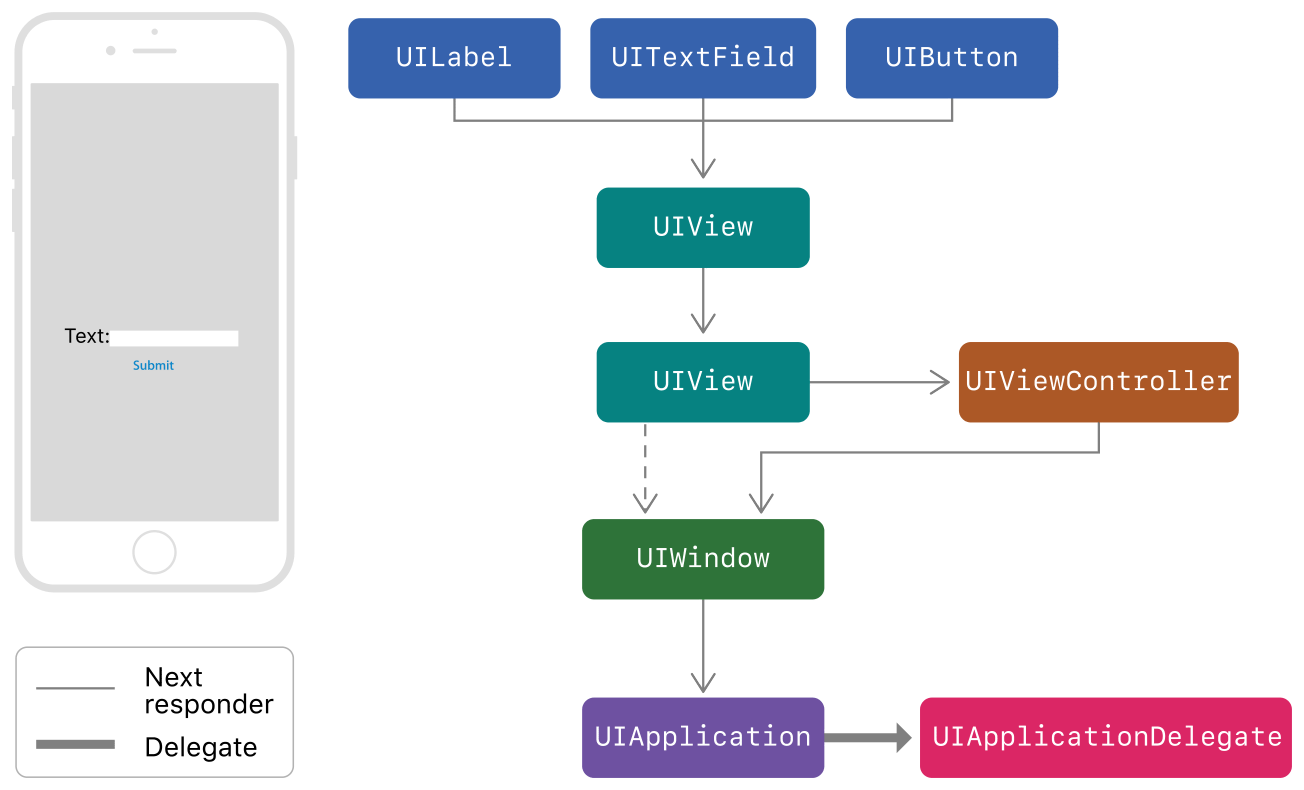
The intended recipient can indicate that it doesn’t want to handle the event by not implementing any of the UIResponder methods listed above, delegating event handling to other objects. These objects must be instances of UIResponder subclasses, and are collectively referred to as responders. Instances of UIApplication, UIWindow, UIViewController, and UIView subclasses are all responders. So how does the application decide on which is the next responder to handle the event? It follows a policy generally referred to as the responder chain.
The Responder Chain
Rules to walk the responder chain is as follows:
Hit-Tested View –> Superview –> … Superviews … –> View Controller –> Window –> Application –> App Delegate
The application takes this path starting from hit-tested view to identify a responder willing to handle the event. If it reached the application delegate without finding one, then event discarded at last.

Hijacking the Responder Chain
A responder, however, can alter the responder chain by explicitly designating the next responder in the chain by overriding UIResponder’s next property.
Designating a Responder
A way to intercept event handling is to simply designate a responder object as the first responder. We’ve probably done this more than a few times in the past:
- Calling
becomeFirstResponder()on a text field when the user taps theNextkey on the keyboard to bring up the next input. - Overriding the
canBecomeFirstResponderand one ofinputView/inputViewController/inputAccessoryView/inputAccessoryViewControllerproperties on our view controller to get that nifty UI in our chat app.
Now we have a slightly better understanding of how everything comes together.